Table of Contents Show
When choosing your RV, models with large windows might draw you in. An RV door window that can give you great views while still allowing you some privacy is an upgrade you’ll appreciate. Today we’re going to look at a few thin shade RV windows.
What Is a Thin Shade RV Window?
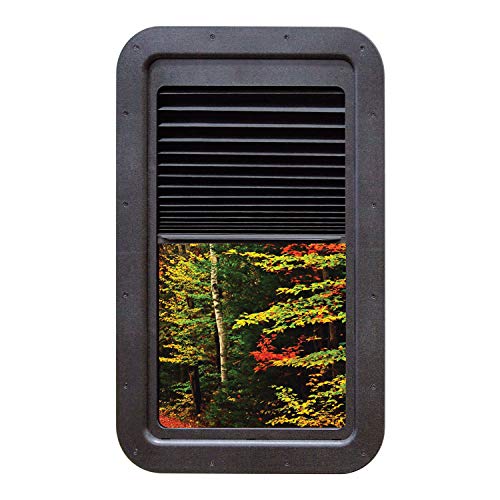
A thin shade RV window replaces the factory-installed window in your door. Install it easily to give yourself more control of your entry window. Most RVs come with a frosted glass window or no window at all. Not having a door window can leave you feeling a bit claustrophobic. A frosted window brings in light (and sometimes unwanted heat) but doesn’t allow you to see outside. A thin shade RV window gives you both a window and privacy.
Benefits of the Thin Shade RV Window
Whether your RV came with a window or you have to cut a hole in your door, it takes some work to install a thin shade RV window. Are the benefits enough to warrant the project? Let’s take a look at the pros of installing a thin shade RV window.
Blocks Sunlight to Keep RV Cool
While these windows allow you to let in the sunshine, they also give you the option to block it. Sunlight pouring in isn’t always welcome. In the height of summer, the sun coming through can quickly make it difficult for the air conditioner to keep up. With a thin shade RV window, you can pull down the shade to help keep your RV cool.
Privacy Without the Fuss of a Curtain
Windows in an RV are great for views. When the sun goes down, those gorgeous views go away, but people might be able to see into your RV. Curtains can be fussy and difficult to attach. Having a quick shade makes it easy to give yourself some privacy.
Quick and Easy Installation
It may seem intimidating to install a thin shade RV window, especially if you have to cut a hole in your door. Thankfully, the installation is faster and easier than you’d expect. Follow the directions closely, and you’ll likely finish in no time.
Two Types: Lippert or AP Products
The Lippert Thin Shade Window Kit and AP Products Thin Shade are the most popular thin shade style RV windows. Both are similar in style and installation. The Lippert Thin Shade is slightly pricier, but Lippert is well-known in the RVing community. It might surprise you, but your RV likely already has several Lippert products on it.
- ENHANCED VIEW - Aesthetically pleasing and easy to install, this kit gives you a clearer view and lets you enhance the...
- EXTRA PRIVACY - When your shade is up you will always have a clear view of the scene outside, plus added privacy...
- Replaces existing window and frame
- Easy installation
How to Install Thin Shade RV Window
Follow these simple steps to install your thin shade RV window. Let’s get started.
1. Remove Current RV Door Window
This step may feel the scariest. You’ll be left with a large hole when you remove the window. If you park your RV uncovered, check the weather before doing this upgrade. You should make sure there’s no rain in the forecast before you begin. Carefully follow the directions for the window you’ve chosen, taking care not to scratch your RV.
2. Clean Up Window Opening
After successfully removing your stock window, give the new window a clean surface to sit on. Use a mild cleaning wipe or spray to clean away any built-up grime or residue. This process will help ensure your new window seals completely to prevent any future water issues.
3. Install Shade in New Window Frame
Thin shade RV windows come in a few easy-to-assemble pieces, one of which is the shade itself. Clip the thin shade into the window hole at the top and bottom to keep it as secure as possible. Some people use clear tape to help keep it secured until it’s fully installed.
4. Center New Window in Window Opening
This is where a second person comes in handy but isn’t necessary. Even though the windows fit snuggly, you may need to do a little bit of adjusting to ensure your window is centered properly on your door. If you don’t center the window, you might cover some exterior decals. A non-centered window frame could also cause decals to be too short, resulting in a premature ending before the window frame.
5. Install New Window with Shade
Now, simply continue with the manufacturer’s directions to complete the installation. Install one side at a time, being careful to secure it properly, so it doesn’t fall out. To secure the window, place the screws by hand to make sure you don’t overtighten. Now step back and look at a job well done!

Safety Precautions for Installing Thin Shade RV Windows
As with any installation project, you should take a few precautions to ensure you don’t damage the product or your RV. Here are a few things to keep in mind.
Make Sure Window Will Fit Your RV
It can be frustrating to wait on a product to arrive, only to realize it doesn’t work. Take proper measurements before purchasing to avoid the annoyance of having to make a return. If you discover it doesn’t fit properly, don’t try to force it as it could cause damage.
Use Supplied Screws
The screws provided by the manufacturer help ensure your window shade mounts correctly. It may be tempting to use screws you already have lying around, but doing so could cause damage to both the window and your RV. A simple project becomes a lot less simple if you use a screw that’s too long, causing it to go through your RV’s exterior wall.
Use Tape to Hold Window in Place if Installing Solo
You’ll likely require some assistance while doing this upgrade. An extra set of hands is always helpful, whether for holding the window or grabbing a needed tool. If you have to install the window solo, use tape. Tape can help hold the window in place so it doesn’t fall before you secure it.
Some RV upgrades are costly and can take days or even weeks to complete. Installing a thin shade RV window is an easy afternoon project that’s worth the effort. Have you swapped out your original window for a thin shade model?
Last update on 2024-12-21 / Affiliate links / Images from Amazon Product Advertising API


