Table of Contents Show
Having problems with your RV black tank can cause you much frustration. It’s not something you want to deal with as an RVer because of the nature of the beast — but it’s a reality. What do you do when your RV black tank valve gets stuck?
Is it going to require intensive labor or specialized tools? Can you fix it yourself, or will you have to spend money hiring a mobile RV tech? Let’s take a closer look at how you can prevent and fix this issue while saving money by doing it yourself.
Help! I Have a Stuck RV Black Tank Valve
Don’t freak out. It’s completely normal for this to happen. Whether you’re a newbie or seasoned RVer, with all of the gunk and grime in your RV black tank, you might have to deal with a stuck valve at some point. It’s a relatively easy process that requires few tools.
Keep In Mind: RVing isn’t always the easy, carefree lifestyle some make it out to be, and we think it’s about time you knew these RV secrets.

How to Unstick Your Stuck RV Black Tank Valve
One way to unstick your RV black tank valve is to put Dawn dish soap and water in your black tank and then drive around. The sloshing around of the liquid will not only clean the inside of your tank, but it can get down into the valve and loosen whatever residue is there.
You can also try tapping on your RV black tank valve with a hammer. Make sure to do this lightly. If you break the valve, you’ll have more work to do and more money to spend replacing it.
Preventing Your Black Tank Valve From Getting Stuck Again
The biggest way to prevent a sticky black tank valve is proper maintenance. You’ll want to keep the rod well lubricated. Every so often, when you dump your black tank, spray lubricant containing silicon on the rod while it’s open.
After emptying your tank, work the valve open and closed a few times and then close it. If this valve breaks, it will be much more difficult to open your RV black tank valve, so do what you can to prevent this from happening.

How to Lubricate RV Tank Gate Valves
The process of lubricating the valve is simple. Buy a tube of lubricant that contains silicon from any big box store or Amazon. Do not use WD-40. This spray is sticky and could cause issues with your seals down the road. Use a product like Dow Corning 111.
As mentioned above, you can simply spray or rub the lubricant on the valve after you’ve dumped the black tank contents. Or you can take off the valve and replace it with a new one. This is easy and fairly cheap and could be the best option. If your valve is getting stuck, you might need to replace it down the road anyway.
If you want to take it a step further, you can remove your RV black tank valve and do a thorough cleaning. Make sure your tanks are empty and clean. Remove the valve from the flanges. Open the valve and soak it in hot, soapy water. Work the valve a few times in the water to ensure all of the residue gets cleaned out.
You can also inspect the seals during this process to make sure they are still in good condition. It’s safe to grease the seals as well when you position the valve back on the flanges.
Pro Tip: There a several methods for cleaning your black tank, find out which method is right for you.

How Often Should You Lubricate Valves?
Lubricating your RV black tank valve should be part of your regular maintenance checklist. When you spray your slide-outs with lubricant each month, go ahead and spray your black tank valve as well. Don’t wait until it gets stuck.
Is It Time to Replace Your Waste Tank Gate Valve?
Replacing your valve is not expensive, and you can do it yourself. It’s especially worth doing if you’re consistently having problems. It might even be worth purchasing a replacement kit and having it on hand. They are universal, so don’t worry about getting the wrong one.
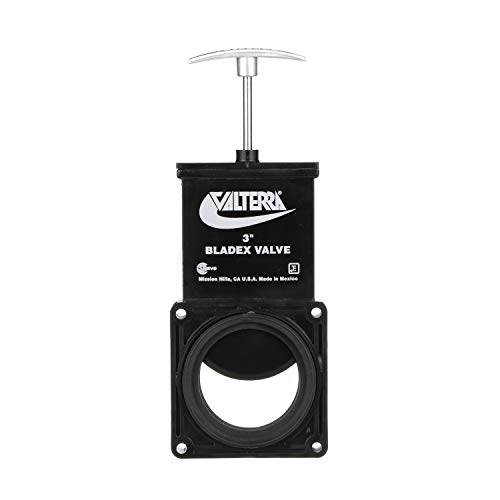
- NO MESS: At-home RV body valve repair is mess-free for your convenience
- VERSATILE: Bladex valve is compatible with GrenTec, Blade, Valterra, Bristol, and Anonda valves
When your RV black tank valve gets harder to open, you don’t want to wait until it breaks. It’s time to replace it. You can reference numerous YouTube videos showing how to go about this, but the entire process should take less than an hour.
If you replace the valve before it breaks, you can plan accordingly rather than being surprised one day and having to deal with it without any notice.
Pro Tip: You don’t need to use expensive RV toilet paper. Check out these RV Toilet Paper Alternatives You’ll Wish You Used Sooner
How to Replace an RV Black Tank Valve
The first thing you need to do is make sure your black tank is empty and clean. Remove the bolts securing the valve. You may want to place a bucket underneath to catch anything that might leak out. Once you detach the valve, clean around the seals and gaskets. Before you insert the new black tank valve, you can lubricate the seal for preventative maintenance.
Once you insert the new valve, replace the bolts. Make sure not to tighten the bolts too much, or you risk cracking the flanges. Open and shut the valve to make sure it works smoothly. You can go ahead and add a lubricant. That’s all.
Preventative Maintenance Wins the Day
Taking care of your RV black tank valve is a necessary task for RVers. Maintenance prevents unwanted surprises. Perhaps you had a great day planned with your spouse, but it gets ruined because you broke your black tank valve in frustration that morning trying to dump your tanks.
Take care of all of the different parts of your RV. That doesn’t mean things won’t break or crack, but do what you can to prevent such issues from happening. When was the last time you lubricated your RV black tank valve?
Last update on 2025-01-19 / Affiliate links / Images from Amazon Product Advertising API


